Quality in Manufacturing
On-machine measurement
Software makes on-machine probing a viable option
By Stephen Logee
Director, Business Development
Wilcox Associates Inc.
Manufacturers are reluctant to use
measurement probes even though they have been available for
CNC machines for years. The biggest impediment to using them
is the sometimes difficult and always time-consuming task of
writing probing macros. In addition, the mistaken ideas that
"doing anything but cutting on a machine tool wastes
precious time" and "you should never measure a part using
the same machine that made it," also pose obstacles.
With new software introduced by at least two
manufacturers in the United States this year, the primary
barriers to on-machine measurement are crumbling. For
example, one of these programs, our PC-DMIS NC, provides
interactive graphic tools for automating the task of
creating probe macros on a workstation away from the machine
tool. By pointing and clicking on a CAD model, programmers
create probing routines in a fraction of the time. Then
operators can launch these routines as they are needed or
cutting programs can call them automatically. Now that it is
easy to generate on-machine measurement routines, consider
what they are good for.
By measuring a few key features at setup,
machine operators can detect a range of errors before they
become costly mistakes. Probing makes it easy to diagnose
problems related to improper tool and work offsets,
erroneous feeds and speeds, buggy NC programs, and the like.
Unlike conventional inspection, it is not necessary or even
desirable to measure all features of the part. Most critical
errors can be found by checking a select group of features.
The trick is to identify the measurements most likely to
highlight problems.
Tool wear is another major contributor to
scrap and rework. By periodically measuring select features
while machining, users can monitor the degree of tool wear
and make informed decisions as to whether they should
replace a tool, adjust their cutting program, or leave
things alone. As a result, manufacturers can now use actual
process data, rather than some arbitrary schedule to decide
when to replace their tools.
Today, operators spend an inordinate amount
of time aligning fixtures and parts during setup. For short
runs, for example, more time can be spent on setup than on
actually removing metal. By using automated, on-machine
measurement, the operator significantly reduces the time
required to set up fixtures and parts. In addition, he or
she can quickly calculate and enter tool and work offsets
(also a big time saver).
Manual, on-machine first piece inspection is
another major setup bottleneck. First the machine is idle
waiting for an inspector to arrive. Then additional time is
lost during the inspection process and while results are
being calculated and entered. With automated on-machine
inspection the machinist only needs to load and launch
previously developed probing routines. If adjustments are
needed, some in-process metrology software, like PC-DMIS NC,
can, in many cases, make them automatically. If not, the
operator can easily interpret the results and make
appropriate corrections quickly. Once production is under
way, automated inspection, integrated with part cutting,
alerts operators of actual and potential problems before
they result in scrap or rework.
When parts, particularly large ones, have to
be removed from the CNC machine for inspection, productivity
can really suffer. The machine may stand idle for hours
(sometimes days) while the part is removed, transported to
the inspection machine, set up, measured, evaluated,
removed, transported back, set up again, and adjusted. Using
in-process metrology software to automatically measure the
part on the machine puts an end to this convoluted process
and dramatically reduces the potential for errors.
In addition to giving immediate feedback,
the in-process metrology package can direct its output to
external databases and software systems to perform such
functions as: SPC, machine and process capabilities studies,
generation of graphic reports, etc.
Solving difficult problems
Given a powerful tool for automating CNC probing, users are
coming up with creative solutions to complex and otherwise
insolvable problems. For example, one early adopter is
investigating the use of on-machine measurement to ensure
that parts actually exist within near net shape castings.
Probing data from PC-DMIS NC goes to a third-party best-fit
analysis package that does the calculations. This makes it
possible to scrap inexpensive, off-spec castings before they
undergo an expensive machining process that has no hope of
succeeding.
Another user is developing a unique
iterative process for manufacturing high-quality lens molds.
The machine tool alternately cuts and automatically measures
the part until the desired curve is achieved. This
integrated operation replaces a manual, off-machine
measurement process that had a scrap rate higher than 50
percent.
Users of this new technology can quickly
take advantage of these cost-saving functions. Furthermore,
by integrating on-machine measurement with powerful database
and analytical tools the system becomes even more capable.
In the near future, second generation systems will not only
provide users with a real time window into manufacturing
processes, but will also make automatic process corrections
on the fly. As users develop a better understanding of these
capabilities, probes that are now gathering dust will
deliver higher metal cutting yields and, more important,
increase productivity.
Companies in this article
Wilcox Associates Inc.
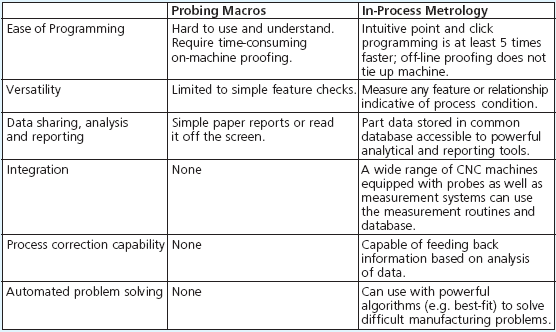
Macros vs. in-process
A single in-process metrology
workstation/server using Wilcox Associates new
PC-DMIS NC can generate measurement subroutines,
manage data flow, and support data analysis for
at least ten CNC machines. Programmers create
inspection routines off-line by pointing and
clicking at a CAD model of the part. Then the
system translates the routines into CNC language
and downloads them to the cutting machine. The
machine operator can execute them as needed or
the cutting programs can call them
automatically.
At the end of each inspection routine, data
automatically return to the server and are
stored in a database. A wide range of analytical
and reporting tools has access to this data. The
following table compares in-process metrology
software to the conventional approach of writing
probing macros.
